- Tips for Your Team
- Tips for Your Team
Recommendations for setting up your audience in Mailchimp
Getting started with Mailchimp or wanting to improve your use?
Here are some tips and best practices.
Our goal is to keep our guidance concise and actionable. If you have questions and need further detail don't hesitate to reach out.
Use a single audience
Use a single Audience (formerly referred to as a "list") for your contacts.
You should think of your audience as your main contact database. For most organizations, a single database is enough. You can create subsets of contacts using tags or other data provided by a contact.
Why?
It's about keeping your contact organization simple for you and your subscribers. It also provides the best chance to learn about your subscribers.
Here are a few reasons why a single audience is what is recommend by us, as well as Mailchimp themselves. A person with the same email address used in two or more audiences are treated as two separate contacts. This impacts a lot. It makes it harder to learn about a person as their reporting data does not aggregate across audiences. Managing their subscription is harder for them as they in essence have two subscriptions. Did you know you are also charged twice for this person?
Only have a second audience when the contacts you would add to it are distinct; when communications you send to these audiences do not overlap at all.
Apply a "Newsletter" tag to contacts
A “tag” is something you apply to your contacts to describe and organize them. You might have a tag for “Board Member”, “Staff”, or “Donor”. Tags can help send more targeted communications to a subset of your audience.
Likely, you have a newsletter or some form of regular communication that you send.
Use a "Newsletter" tag for all of your contacts that you want to receive your newsletter.
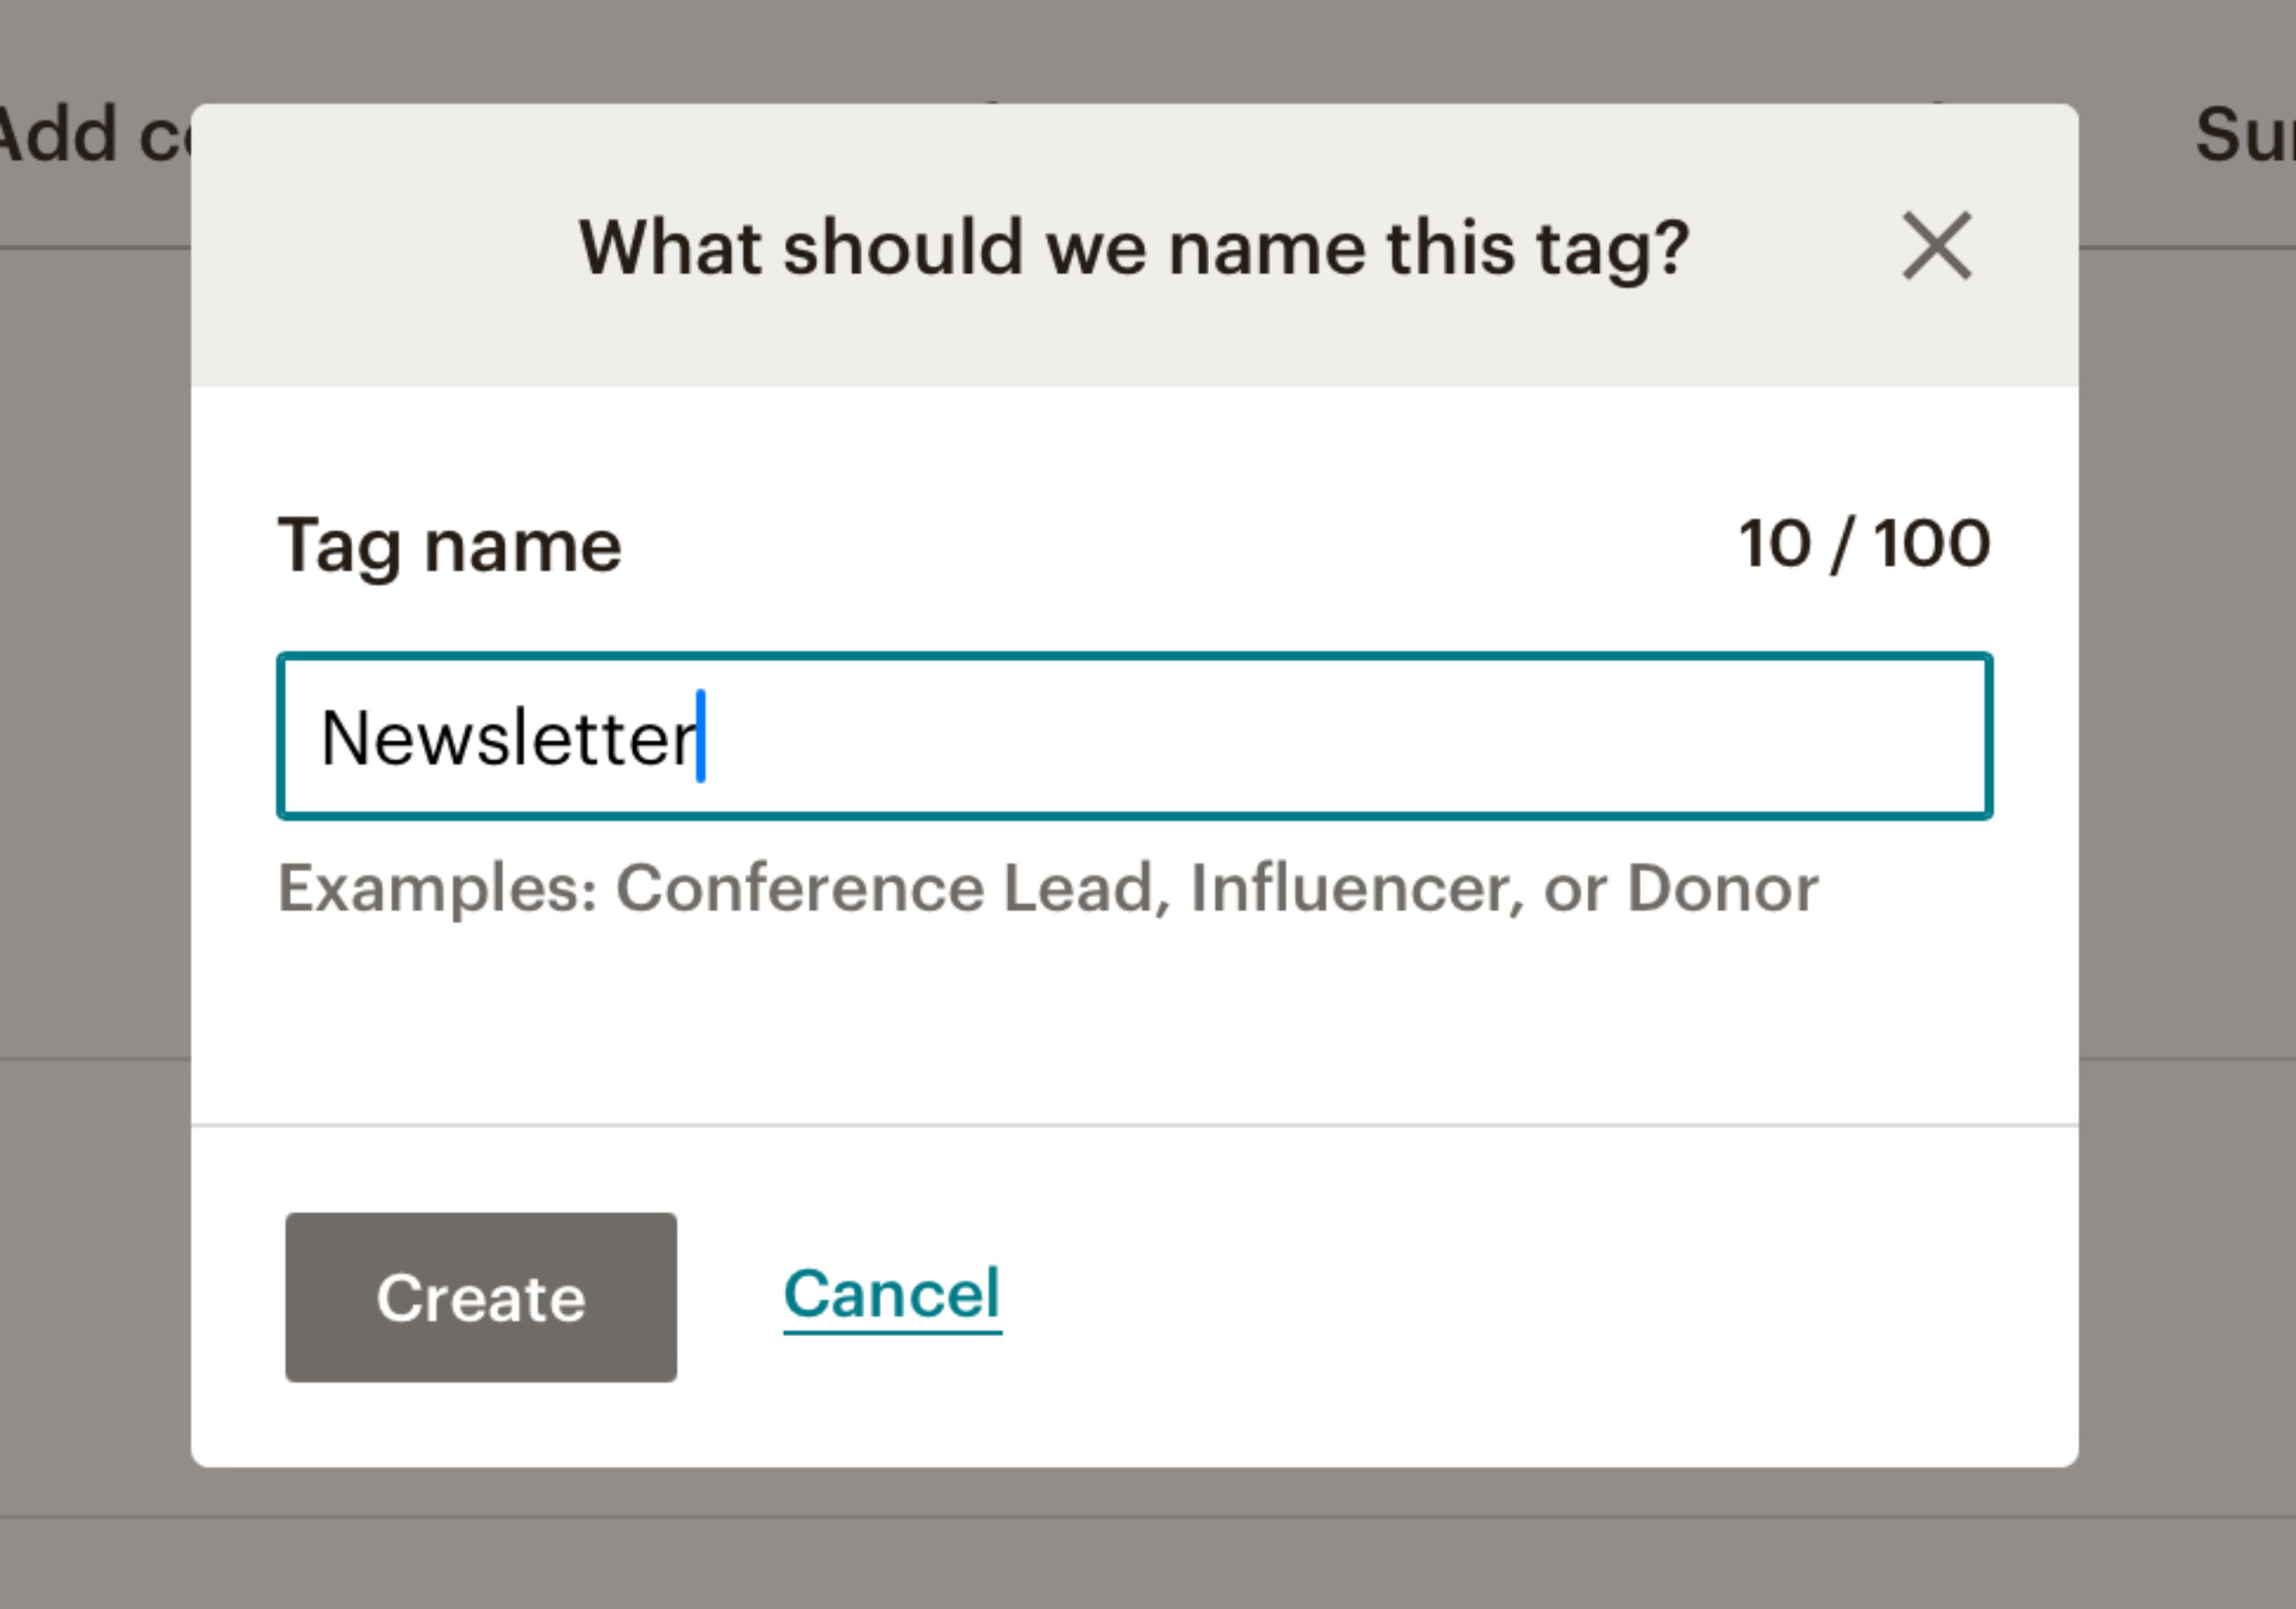
Create a “Newsletter” tag to create a group of contacts to explicitly target for your newsletter mailings.
Why?
Often, organizations will send their newsletter to their entire audience. Why create a "Newsletter" tag if most, if not all, of your contacts will receive it? As you get more sophisticated with your use of Mailchimp, it is more likely that not all audience members will be newsletter subscribers.
Here are two examples to consider.
- You may opt to add donors to your audience. Donors may have subscribed to your Newsletter or may not have. The “Newsletter” tag can help make sure that a donor who did not subscribe does not feel spammed.
- You might have a welcome series when someone first subscribes to your mailing list. It is best if a contact doesn't receive your newsletter until the welcome series is complete. You can make this happen by applying the “Newsletter” tag at the end of the series. This way there is focus on your onboarding experience before regular communications start.
In essence, our advice is rarely, if ever, send an email to your entire audience. Always have tags/segments that you use to target.
When you create an email campaign and define who you want to send your mailing to, you can select a tag as your target.

A tag can be used to define who within your audience you want to send an email campaign to.
Add tags to individual contacts, via import, or as part of automations. We like to automate wherever possible. We recommend applying the "Newsletter" tag as part of a welcome email automation. Keep reading for more details about this.
For more about managing tags check out Mailchimp's manage tags guide.
Create a welcome journey
Setting up an automated email (or multiple) when someone subscribes to your list is a must do.
Why?
A welcome email or series is a great opportunity to onboard new subscribers to your organization and the content and services your offer.
It is also a great way to apply your "Newsletter" tag.
Here are some tips to setup your welcome journey in Mailchimp.
For more detailed information visit Mailchimp's journey builder help.
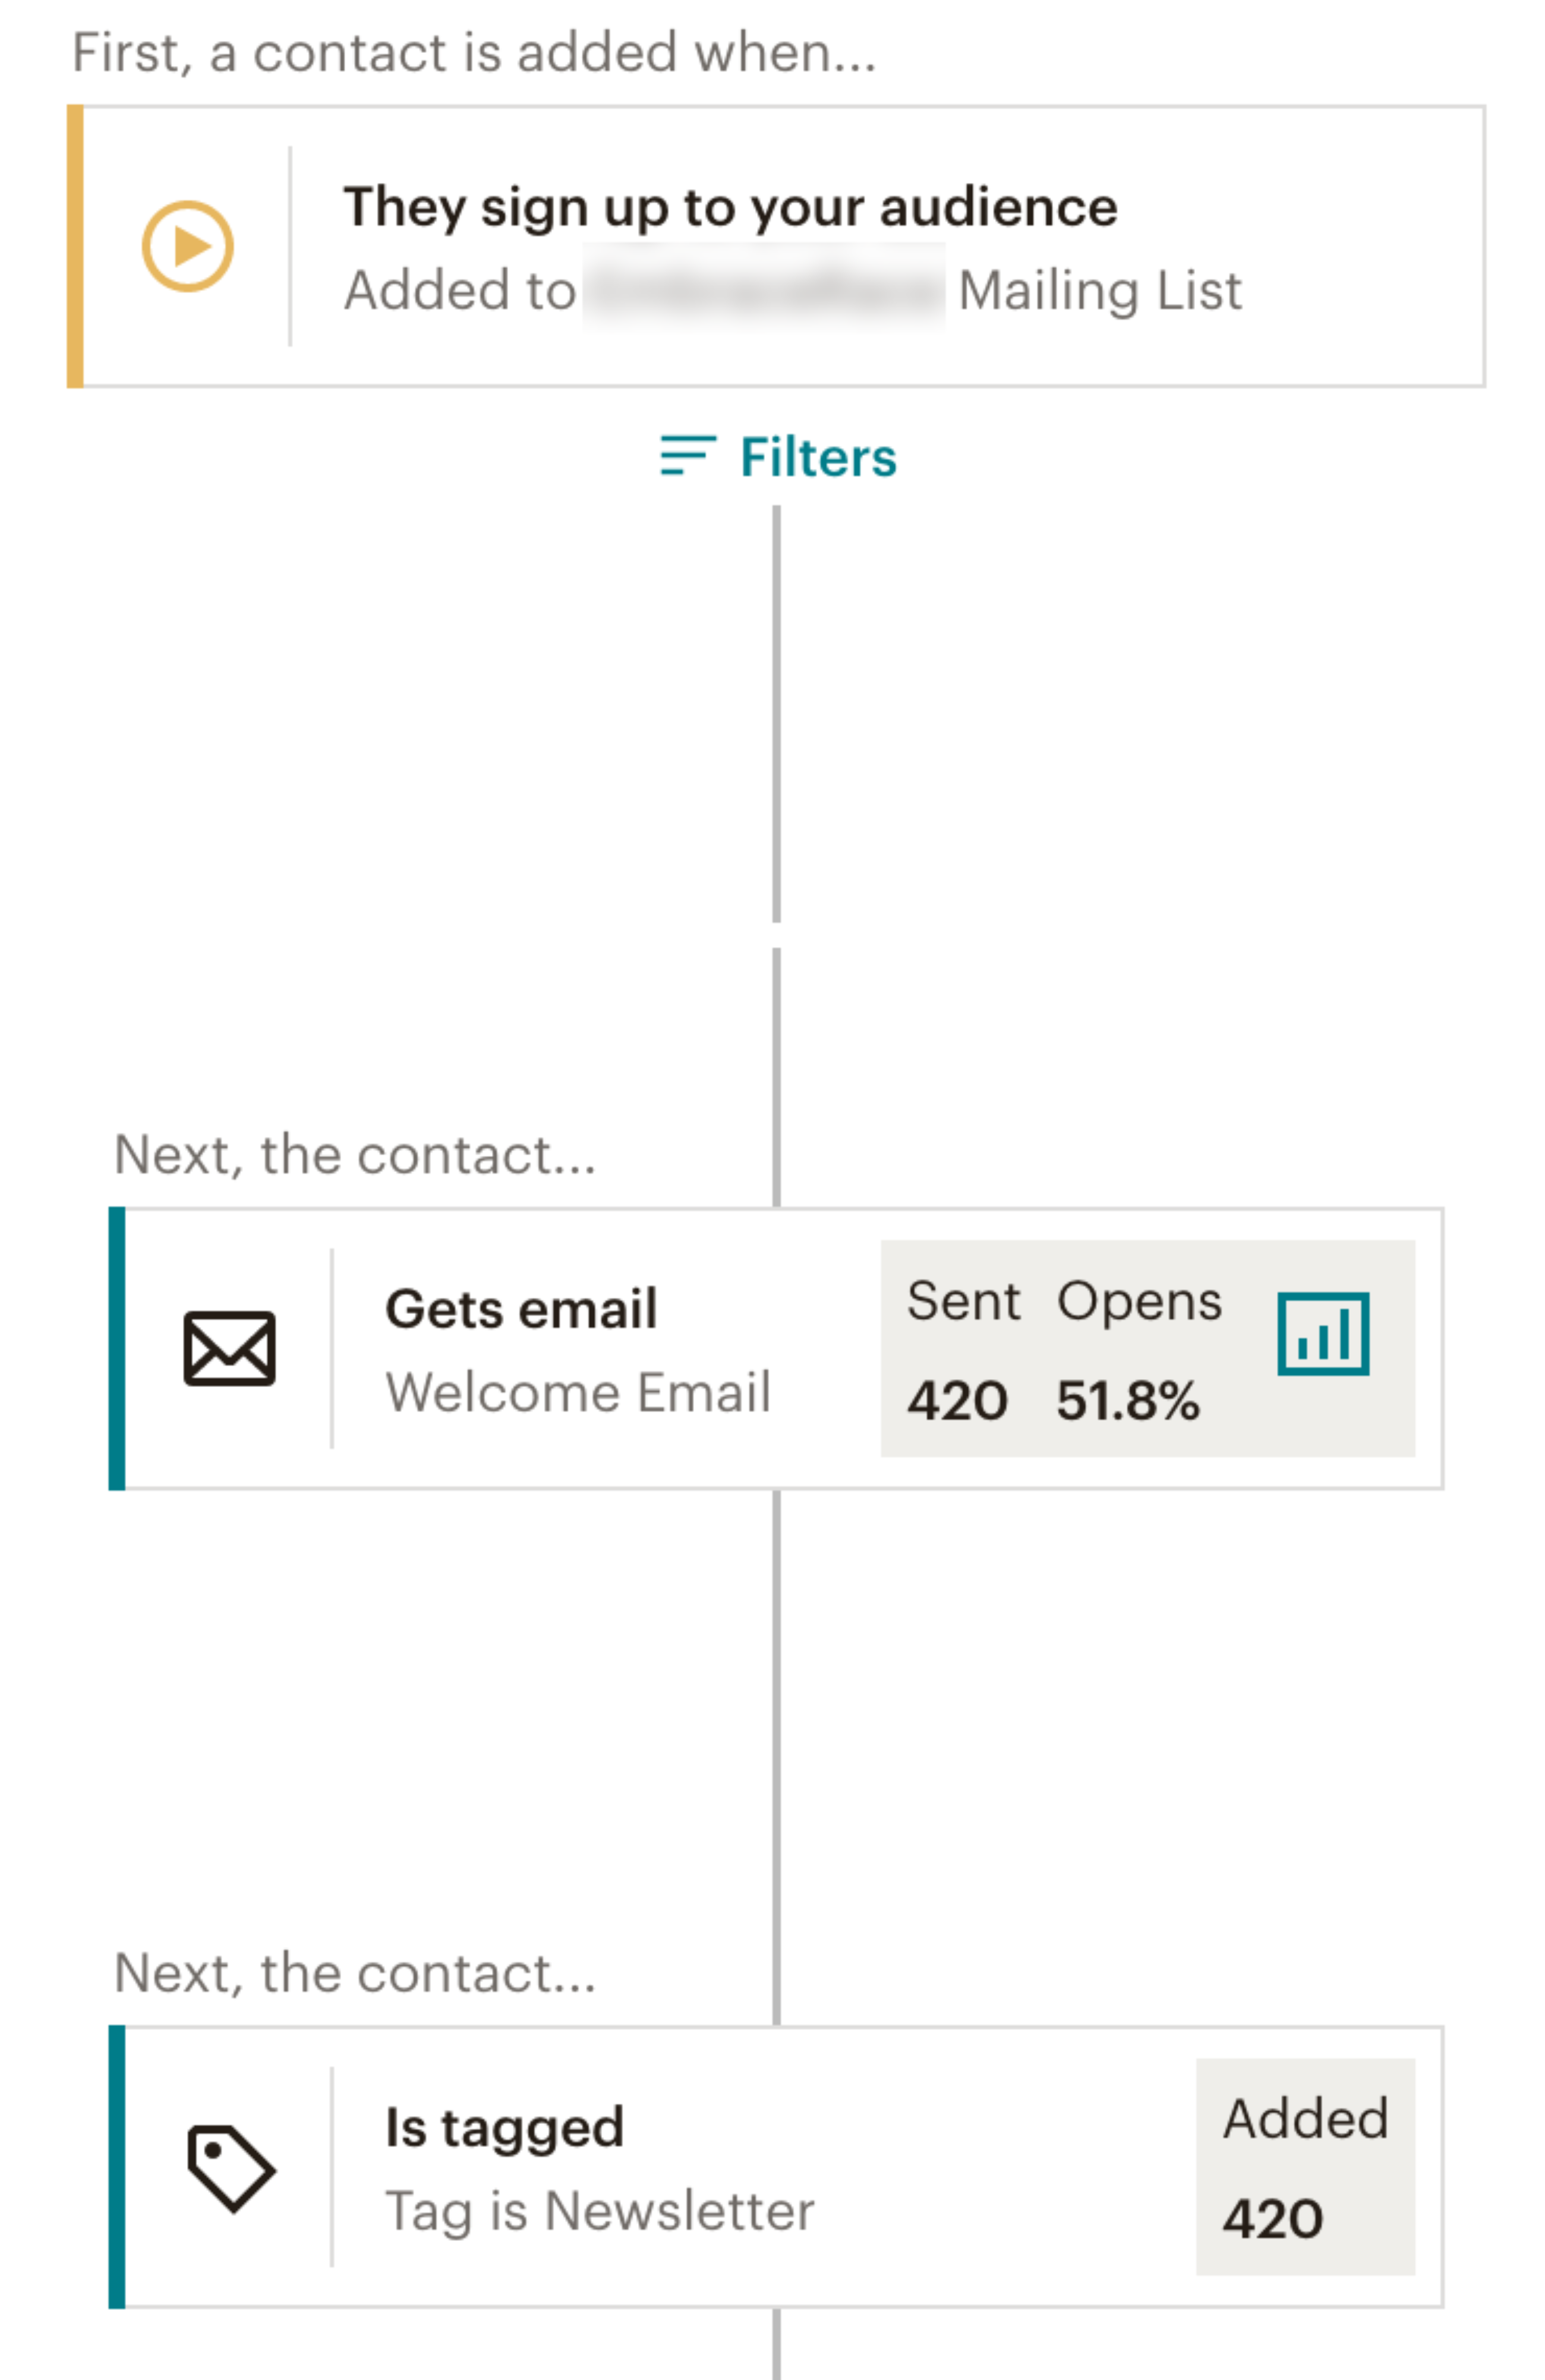
There are three steps to the basic welcome journey we like to set up.
- Set the start of the journey to be when someone signs up to your audience.
- Send your welcome email.
- Finally, tag the contact with "Newsletter".
Keep your subscribe form simple
Your form needs to include an email address, and then the rest is up to you. We recommend to ask for an optional First Name alongside the email.
Why?
Collecting a first name allows you to personalize your emails. Your emails can start with a nice friendly "Hello Seth" greeting. This is both simple and powerful to do.
There are times to ask for more information from a contact. You should only ask for more when there is a plan to use the data collected. Otherwise, a more complex form will lead to less signups. Best to keep it simple in most cases.
Set a default for your First Name field
With the "First Name" field set as optional, we need to make sure we have a fallback. Mailchimp's "Default merge tag value" feature is critical for this. When you use the first name merge tag in your email, the value you enter as the default will show if a subscriber has not provided their name. We often use "Friend" as the default.
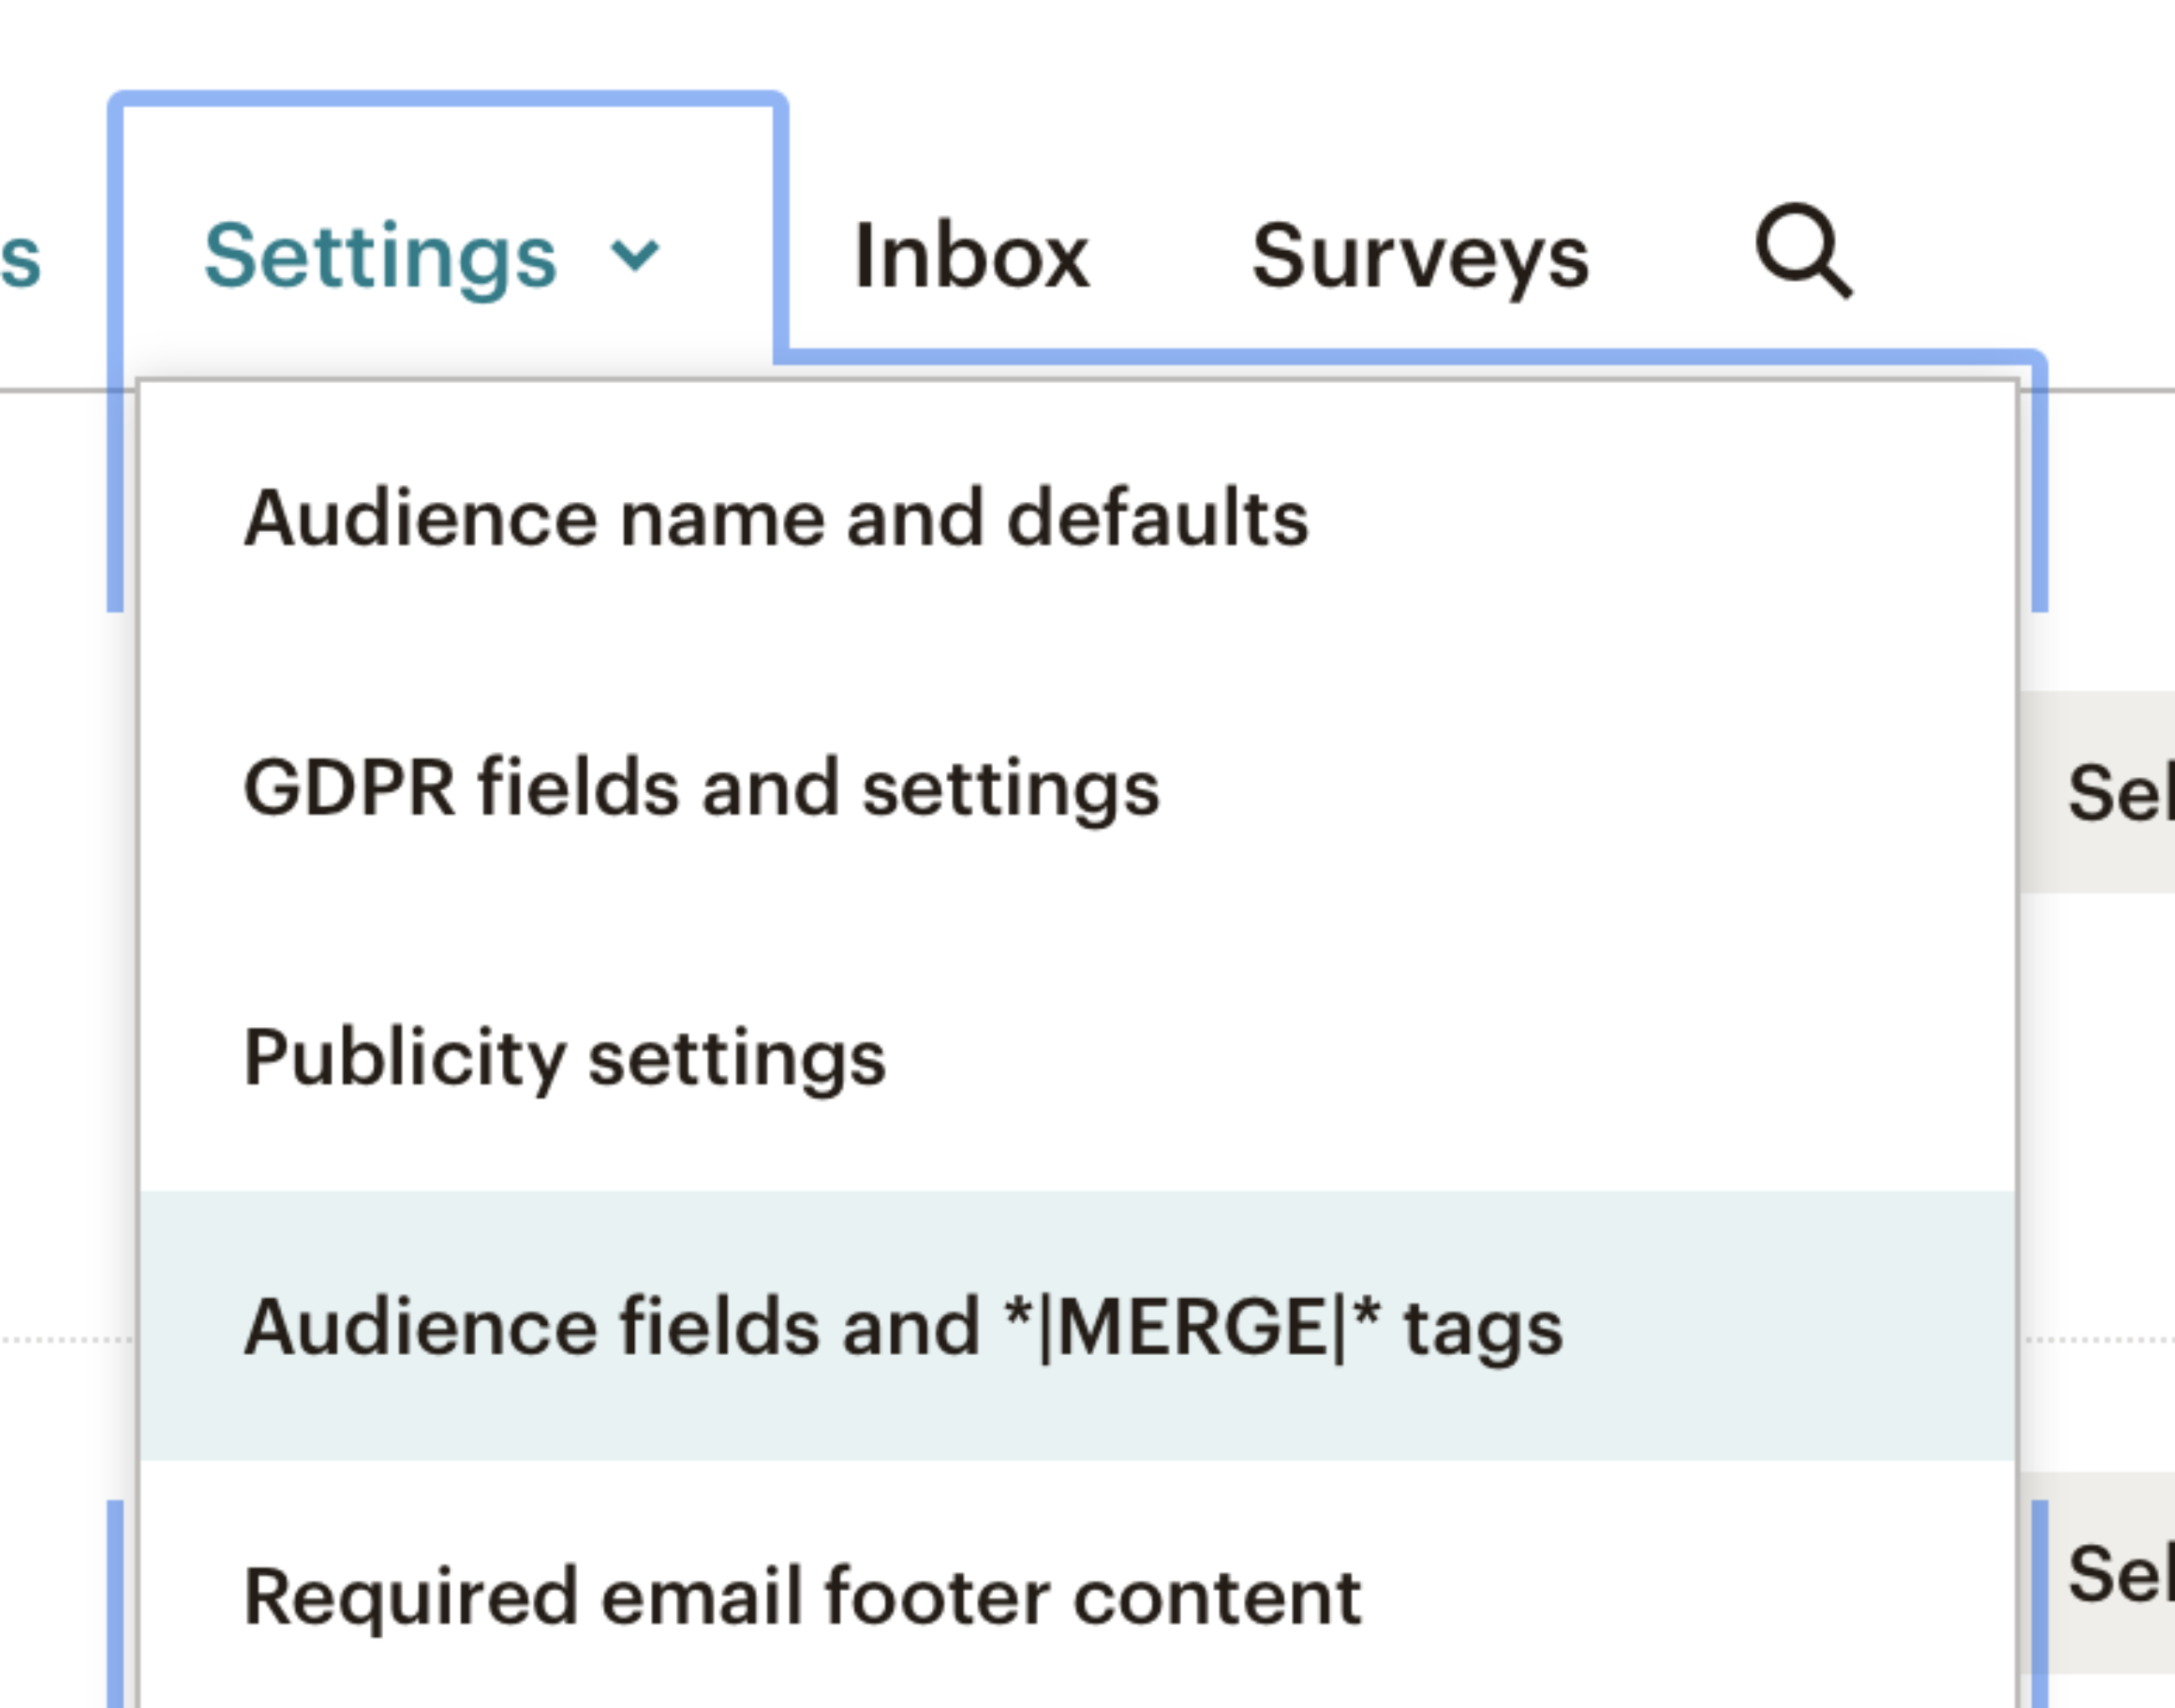
1. Go to your Audience and in the settings menu select "Audience fields and *|MERGE|* tags".
2. Then for first name enter your default merge tag value.

Create a thank you page on your website and redirect new subscribers to it upon subscribe
If you are trying to build your email list through your website, it is helpful to track a new subscribe as a website goal. This data helps assess any changes made to inspire more email susbcribes. Doing this with Google Analytics or similar metric solution requires some simple creativity.
We like to setup a "thank you for subscribing" page on the websites we build.
Why?
This makes it a little easier and more accurate to track an email subscribe goal. You configure your "Email Subscribe" goal in Google Analytics to "trigger" when someone visits this thank you page.
First step is to create the page on your website. Then you need to set it up in Mailchimp.
- Go to your Audience and then select Sign Up Forms.
- Then select "Confirmation thank you page" from the Form Builder options.
- Then enter the URL to the thank you page you created on your website.

A Strong Foundation
A strong foundation for using Mailchimp for your nonprofit, foundation, or social good team is important. In summary, the following is a great place to start and build from.
- Strive for a single audience to keep both you and your contacts' experience focused.
- Apply a newsletter tag to be intentional about who will receive your regular email blast.
- Create an automated welcome journey to engage your new subscribers. Tag them with "Newsletter" at the end of the journey.
- Keep your subscriber form simple. Starting with email and an optional "First Name" field. Don't forget to set the default value for the First Name merge field.
- Create and direct subscribers to a thank you page on your website. Use this to set a page visit goal for this in Google Analytics.
We hope you find this helpful. If you have any questions about your organization's use of Mailchimp, please don't hesitate to reach out.
More Articles
- Expand Your Marketing and Outreach
A content strategy for small nonprofit teams: Start with your website and work out
- Expand Your Marketing and Outreach
Building a visual language from your nonprofit’s logo
Mightier Newsletter
Join our community of nonprofiteers and the partners that support them. Our monthly newsletter includes resources with small and mighty teams in the social sector in mind – sharing tips to help with content creation, website use, marketing, and more.
SubscribeBrought to you by MOD-Lab
At MOD-Lab, we're the thoughtful design partner for small teams like yours doing big things in the social sector. We create memorable branding, design materials, and websites that showcase the quality of your work and reflect your true impact.

